Ease your Machine Learning work with MLflow
The tool we need
Have you ever ran an experiment and forgot what data or parameters were used?
I feel like I’m repeating myself, but Machine Learning is in a reprodicibility crisis and it’s not only because of carelessness. Indeed, traditional tools to track code are not enough because data, parameters, and metrics are as important for us.
MLflow 1 is an open-source platform that helps to manage the ML lifecycle, including experimentation, reproducibility, and deployment. It’s designed to work with any library or language and with only a few changes to existing code. It currently has 3 components:
- MLflow Tracking: Record and query experiments: code, data, config, and results.
- MLflow Projects: Packaging format for reproducible runs on any platform.
- MLflow Models: General format for sending models to diverse deployment tools.
More and more big companies like databricks and Microsoft are contributing to it because it is the perfect tool to track every experiment and project from a single user to large groups thanks to its nice UI.
Based on my precedent post on dockerizing your Machine Learning services, I’ll show you how to integrate MLflow in your usual workflow.
Recording the experiments
The first thing to do is to create an experiment. You can do it programmatically but I prefer to do it with the Command Line:
mlflow experiments create --experiment-name irisIt’s going to create a specific space in the UI to make your experiments more readable.
We are working on a simple example, but let’s say your training data can change over time, you’ll want to save its state for each run. This can be achieved with the function:
mlflow.log_artifact(path)Then, you can also log all you parameters thanks to the function
mlflow.log_param(name, value)Finally, you can track the metrics of your experiments with
mlflow.log_metric(name, value)Everything is going to be saved under a mlruns repository.
Wrap up
In the end, the training file becomes:
client = MlflowClient()
experiment = client.get_experiment_by_name("iris")
with mlflow.start_run(experiment_id=experiment.experiment_id):
    # Import dataset
    logging.info(f"reading {input_path}")
    mlflow.log_artifact(input_path)
    iris = pd.read_csv(input_path)
    X = iris.drop("Species", axis=1)
    y = iris.Species
    # Instantiate PCA
    pca = PCA()
    # Instantiate LogReg
    logistic = SGDClassifier(loss="log", penalty="l2", max_iter=100, tol=1e-3, random_state=42)
    mlflow.log_params(logistic.get_params())
    param_grid = {
        "pca__n_components": [2, 3],
        "logistic__alpha": np.logspace(-4, 4, 5)
    }
    mlflow.log_params(param_grid)
    # Define training pipeline
    pipe = Pipeline(step=[('pca', pca), ('logistic', logistic)])
    # Training
    logging.info("beginning training")
    search = GridSearchCV(pipe, param_grid, iid=False, cv=3, return_train_score=False)
    search.fit(X, y)
    print(f"best paramer (CV score={search.best_score_})")
    print(search.best_params_)
    mlflow.log_params(search.best_params_)
    mlflow.log_metric("best score", search.best_score_)
    # Save best model
    logging.info("saving best model")
    dump(search.best_estimator_, output_path)
    mlflow.log_artifact(output_path)
Navigate the UI
To access the UI, execute mlflow ui.

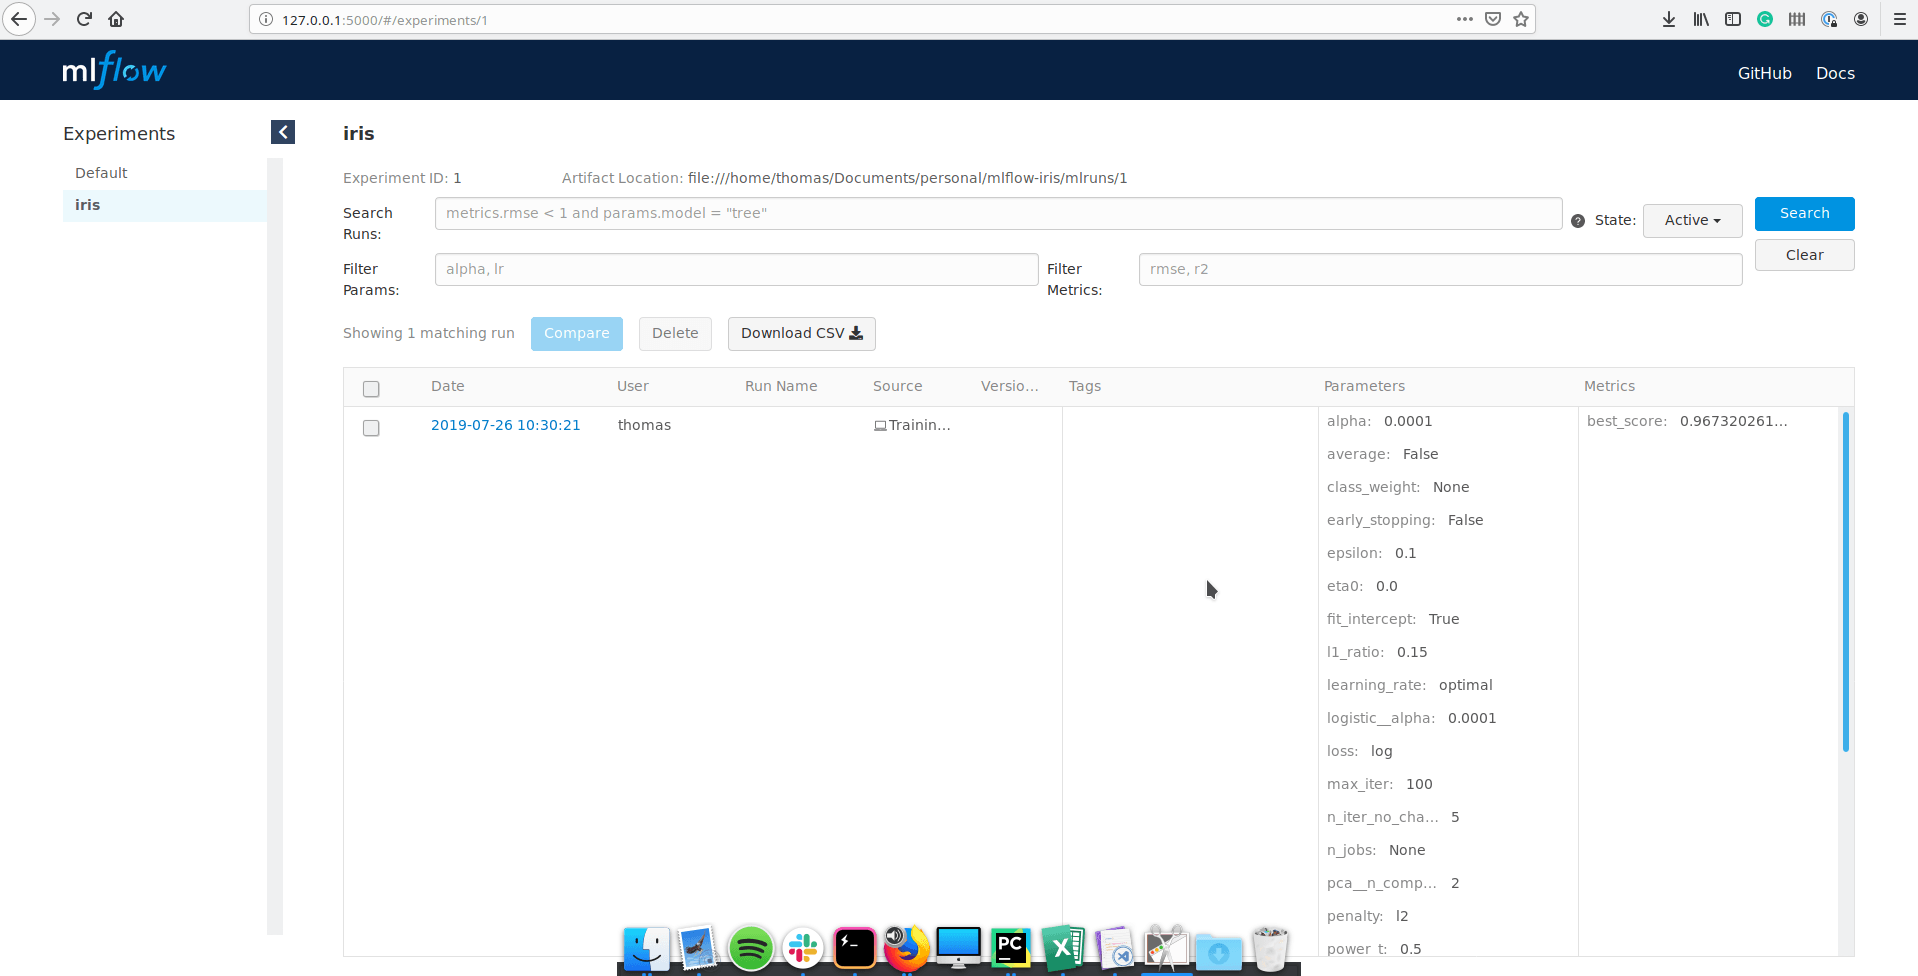
I’m under the iris experiment, and we can see all the runs. It is also possible to search specific runs with a SQL-like syntax by filtering with some parameter, metrics or value.
If you click on a run, you have access to a more detailed view:

You can still see parameters and metrics, but you can also add some notes, tag the run and even look at the artifacts you’ve saved. All the information is saved and accessible in a convenient way.
Defining a project
MLflow Projects are a convention for organizing and describing your code to let other data scientists (or automated tools) run it, described by a MLproject file, which is a YAML formatted text file.
A project is defined by a name, an environment that can be a Conda environment, a Docker container or a system environment, and a list of entry points.
As a matter of example, here is the MLproject file for the Iris project:
name: iris
conda_env: environment.yml

entry_points:
  train:
    parameters:
      input_file: path
      output_file: path
    command: "python Training.py {input_file} {output_file}
  infer:
    parameters:
      classifier_path: path
      input_file: path
    command: "python Inference.py {classifier_path} {input_file}"
MLflow supports four types of parameters: string, float, path, uri, and checks they are correct. You can also define default values for each parameter.
This file is easy to grasp for a collaborator to quickly work on this project. All he/she has to do is to pull the git repository and can train right away with:
mlflow run . -e train -P input_file=data/iris.csv -P output_file=models/logreg.joblibThis command creates a conda environment from the environement.yml file, run the endpoint train in the current directory and define the parameters input_file and output_file.
When you’re iterating on your experiments, you’ll want to append the flag --no-conda to use your current conda environment.
Conclusion
The more I use MLflow, the more I like it. It is nice it is not tied to any particular framework or language. More and more companies are contributing and I would not be surprised if it became a standard shortly.
MLflow is going to be even more interesting soon with new components like MLflow Workflow that enables to define workflow and run them with Airflow among others and MLflow Model Registry to get better possibilities for tagging and deploying models.
If you want to learn more about what’s to come, you can watch the video: Accelerating the Machine Learning Lifecycle with MLflow 1.0
Visit my repository on GitHub for the whole source code.
Links
Footnotes
MLflow website## The tool we need ↩

